If you’ve ever wanted to try a Linux distros such as Ubuntu, you have noticed that you can use a USB thumb drive to create a bootable “Live USB” for it. This means that you don’t have to install the distro on your system, and you can boot via the Live USB and test it out. If you like the distro, you can install it from the USB. The process of doing this is straightforward and can be done on any Mac (and even on Windows PC). So, if you wonder how you can create a Live USB drive, and boot it into the live Linux USB drive on Mac, here’s how to do it:
To live-boot into the Linux on Mac, you’ll first have to create a Live USB drive for the distro you want. We will demonstrate this using a Ubuntu 14.10 “Yakkety Yak,” on a Mac Air running the latest version of macOS Sierra. You can even download the Ubuntu from the official website, for free. Once you have downloaded that, you can move on to the next step with this guide. Make sure USB drives have at least 8 GB of capacity.
Note: The data on this USB drive will be erased. Make sure you have a backup of any of the essential files you may have on the selected USB.
To create a Bootable USB drive for Ubuntu on your macOS, follow the mentioned steps:
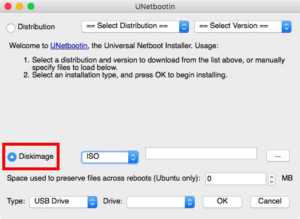
1. Download the UNetbootin, and install it on your Mac computer. Launch the app and click on the button next to “Disk Image.”

2. Click on the button labeled with “…” and select the ISO file you have just downloaded from the Ubuntu website.
3. Now, connect the USB thumb drive that you want to use as the Live USB, launch Terminal, and type “diskutil list.” Check the “identifier” for your USB drive.
4. In UNetbootin, select this identifier in the drop-down menu called “Drive.”
Note: Make sure that you’ve selected the identifier for your USB stick because the selected drive will be formatted.
5. Once you’re confident that you have selected the correct drive, click on “OK.” button.
UNetbootin will now go through a couple of steps and create a bootable Live USB drive that you can use to boot it into Linux on your Mac computer.
When you shut down a Live Session in Linux, any changes you make are not saved. So, if you install any app, or create a document in Ubuntu while it is in Live mode, they will not be saved and will not be available the next time you boot into the OS with this Live USB. If you want to keep changes you made between the reboots, you can also do that by setting a reserved value under “Space used to preserve files across reboots (Ubuntu only).”
Now, the Live USB has been created, let’s see how we can boot into one using the Mac Startup Manager. If you don’t know how to start the Startup Manager on Mac, follow the steps given below:
1. Keep the Live USB plugged into your Mac, and shut it your computer. Then, press the power button and then hold the “option” key button until you the “Startup Manager” pop-ups.
2. Here, you will find all of the drives that your MacBook can be booted up from, including the “Macintosh HD,” which contains the macOS Sierra. Most probably, you will get only two options available, one of which will be “Macintosh HD,” and others will be Linux USB drive “Windows or EFI.” Use the arrow keys to select/ highlight the Linux drive and then press the “Return/Enter” button.
Your Mac will now use the highlighted USB drive to boot it into Ubuntu. When you see a blue-screen with some of the options, choose the one that says “Try Ubuntu without Installing,” and press “Return/Enter.” Your Mac will boot up in Ubuntu.
You can use this method to boot up Mac from a Live USB disk of a Linux distro. Using Live Sessions is excellent if you don’t have to install the operating system on your hard drive or SSD. Your macOS will remain safe from anything you do on the Live Linux OS. If you want to boot back into the macOS Sierra. Shut down the Live Session, and remove the USB stick and start your Mac by pressing the power button.
If you got any of the questions, please feel free to ask, and do let us know about your thoughts about using Live USB drives to boot into Linux distros in the comments section below.
This website uses cookies.
Read More